

How to Adjust Grind Size for Specialty Coffee
Table of Contents
- Why Grind Size Decides How Your Specialty Coffee Tastes
- Coffee Grind Size Chart: Match Particle Size to Your Brew Method
- Coffee Grind Size for Pour-Over: Getting the Drawdown Right
- How to Dial In Espresso: A Step-by-Step Grind Adjustment Workflow
- Coffee Grind Size Troubleshooting: Beyond Sour and Bitter
- Freshness, Roast Level, and Why Your Grind Setting Keeps Moving
- Keep Your Grinder Consistent
- Frequently Asked Questions
Last Updated: October 12, 2026
Why Grind Size Decides How Your Specialty Coffee Tastes
Grind size is the single most powerful adjustment you can make to a cup of specialty coffee. It controls how fast water moves through the coffee bed, and that speed decides how much flavor ends up in your mug.
At Everything I Need, we roast in small batches and ship fast, but even the best beans can taste flat if the grind is wrong. The good news: once you learn to read the signs, adjusting grind size becomes second nature.
Here is the core idea. Smaller particles expose more surface area. Water pulls flavor out faster. Bigger particles slow everything down. Too fast and you get sour, thin coffee. Too slow and you get bitter, harsh coffee. The sweet spot sits between the two, and it shifts with every brew method.
A common mistake is chasing the perfect setting once and never touching it again. Coffee changes daily. Freshness, roast level, and even room humidity all nudge your results. The skill is not finding one magic number. It is learning how to respond when the cup drifts.
Below, we walk through a grind size chart by brew method, a repeatable espresso workflow, and troubleshooting steps that go past the usual "sour means finer" advice.
Coffee Grind Size Chart: Match Particle Size to Your Brew Method
Every brew method has a target range. Start inside it, then fine-tune by taste.
Brew Method |
Grind Size |
Texture Reference |
Typical Brew Time |
|---|---|---|---|
Coarse |
Sea salt |
4-5 minutes |
|
Drip coffee |
Medium |
Table salt |
4-6 minutes |
Pour-over |
Medium-fine |
Fine sand |
2.5-3.5 minutes |
AeroPress |
Fine to medium-fine |
Fine sand to powder |
1.5-2.5 minutes |
Espresso |
Fine |
Powdered sugar |
25-30 seconds |
The Specialty Coffee Association's brewing standards offer a useful baseline for extraction, though your grinder and taste buds have the final word.
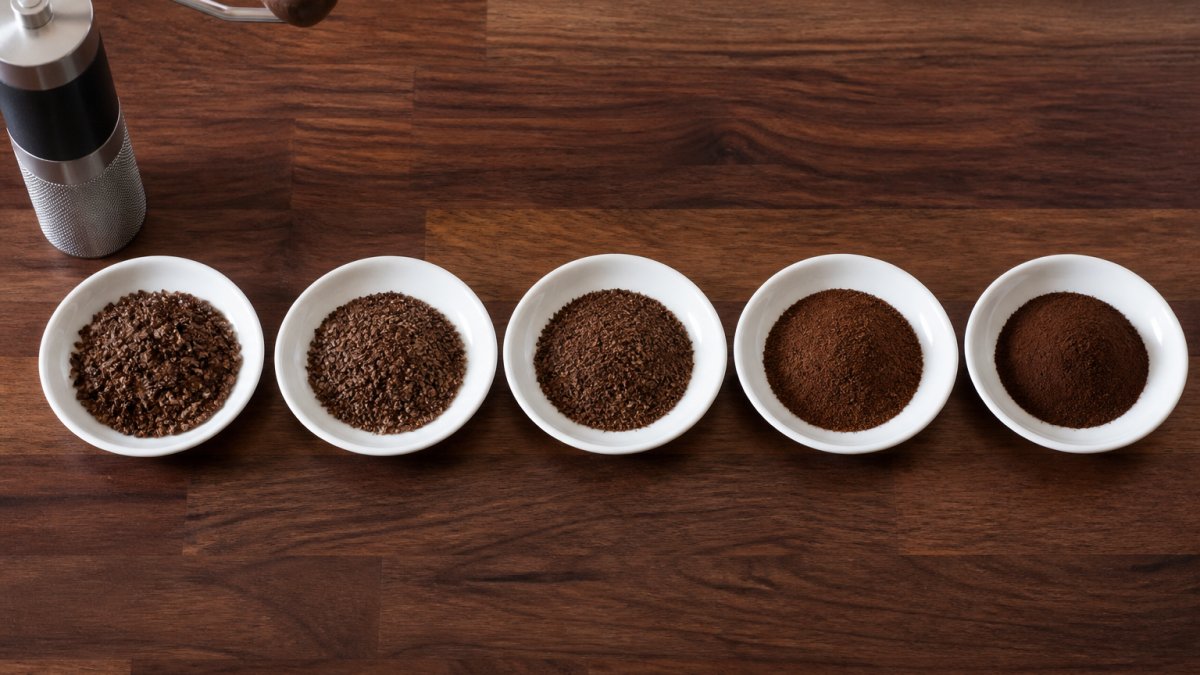
Coarse, Medium, and Fine: What Each Grind Looks Like
You do not need a microscope. Your fingertips work fine.
- Coarse: Feels like sea salt or rough sand. Distinct grains you can pick up.
- Medium: Feels like table salt. Slightly gritty, holds together when pinched.
- Medium-fine: Feels like fine sand. Smooth but still textured.
- Fine: Feels like powdered sugar. Clumps easily and coats your fingers.
If you are coming from a blade grinder, expect inconsistency. A burr grinder produces even particle size, which is why it matters for repeatable results.
Coffee Grind Size for Pour-Over: Getting the Drawdown Right
Coffee grind size for pour-over should produce a total brew time of about 2.5 to 3.5 minutes for a standard single cup. Drawdown, the time it takes water to drain through the bed, tells you whether your grind is close.
Watch the flow. If the bed drains in under two minutes, your grind is too coarse. Water rushes past the grounds without pulling out enough sweetness. Go finer.
If the bed stalls and drains past four minutes, your grind is too fine. Water sits too long and pulls bitter compounds. Go coarser.
A few practical notes:
- Change one variable at a time. Grind first, then water temperature.
- Keep your dose steady so you are comparing like with like.
- Weigh your coffee. Eyeballing leads to noisy results.
- Note the taste alongside the time. Time is a clue, not the verdict.
How to Dial In Espresso: A Step-by-Step Grind Adjustment Workflow
Dialing in espresso means tuning your grind until a shot hits your target taste and time. It is a loop, not a one-time setup. The reason grind matters so much here is mechanical: a finer grind increases resistance in the puck, which slows flow and raises extraction; a coarser grind lowers resistance, speeds flow, and lowers extraction. Every adjustment you make is really a flow-rate adjustment.
Here is the workflow we recommend.
Step 1: Fix Your Dose and Target Yield
Lock in your dose and yield before touching the grinder. A common starting ratio is 1:2, meaning 18 grams of coffee in, 36 grams of espresso out.
Keep these constant:
- Dose weight
- Target yield weight
- Water temperature
- Tamping pressure
If dose drifts, every grind change becomes meaningless. You will not know what caused the shift.
Step 2: Change One Grinder Step at a Time
Move the grind setting by the smallest step your grinder allows. Pull a shot. Weigh the yield and time it.
- Shot runs under 25 seconds: grind finer.
- Shot runs over 30 seconds: grind coarser.
- Shot lands in range but tastes sour: grind finer in tiny steps.
- Shot lands in range but tastes bitter: grind coarser in tiny steps.
Change one step, then re-test. Big jumps overshoot the target and waste beans.
Step 3: Read the Flow, Not Just the Clock
Time is a clue, not the verdict. Watch the stream as it leaves the portafilter:
- A thin, fast, pale stream that blondes early usually means under-extraction. Go finer.
- A slow, dark, dripping stream that stalls means over-extraction. Go coarser.
- A stream that gushes, sputters, or sprays sideways is channeling, where water finds a path of least resistance through the puck. Fix distribution and tamp first; if it persists, your grind is likely too fine or too uneven.
Step 4: Repeat the Loop for Any Brew Method
The same loop works for pour-over, immersion, and drip. The only thing that changes is the target:
- Espresso: 1:2 ratio, 25-30 seconds, fine grind.
- Pour-over: 1:16 ratio, 2.5-3.5 minutes total, medium-fine grind.
- Immersion (French press): 1:15 ratio, 4-5 minutes steep, coarse grind.
- Drip: 1:16 ratio, 4-6 minutes, medium grind.
For each method: set a baseline, change grind by one step, hold everything else constant, taste, and record. Then adjust again. This is the adjustment loop, and it is the same whether you are chasing a 27-second shot or a 3-minute pour-over.
If your shot tastes great but the time is slightly off, leave it alone. Taste beats stopwatch every time. Chasing a textbook time can ruin a shot you already enjoy.
A Note on Beans and Freshness
Freshly roasted beans release carbon dioxide, which slows water flow. As beans age, you often need to grind finer to hit the same taste. This is why a setting that worked last week may need a nudge today. It is not your grinder drifting; it is the coffee changing.
Coffee Grind Size Troubleshooting: Beyond Sour and Bitter
Coffee grind size troubleshooting usually stops at sour and bitter. That leaves out the problems that actually frustrate most brewers.
Look for these signals instead:
- Hollow or watery cup: often under-extraction from too coarse a grind.
- Dry, astringent finish: usually over-extraction or too fine a grind.
- Uneven flow, gushing, or spurting in espresso: a sign of channeling, where water finds a path of least resistance through the puck.
- Muddy, silty cup: too many fine particles, often from a blade grinder or worn burrs.
- Inconsistent shots back to back: poor grind consistency or stale beans.
Channeling deserves special attention. It is not always a grind problem. Distribution and tamping matter too. But if channeling persists after you fix your prep, your grind is likely too fine or too uneven.
Calibrating Your Grinder and Translating Settings Between Grinders
Grinder settings do not transfer between models. A "15" on one grinder is meaningless on another. Calibrate by taste and texture, not numbers.
To translate a setting, use this approach:
- Find the zero point, where burrs just touch.
- Note how many steps sit between zero and your current setting.
- On the new grinder, find its zero point.
- Match the relative position, not the number.
- Pull a test shot or brew, then adjust from there.
This gets you close. Fine-tuning still happens by taste.
Freshness, Roast Level, and Why Your Grind Setting Keeps Moving
Your grind setting drifts because coffee itself changes. This is normal, and it is why a "set it and forget it" mindset fails.
Three forces move your setting:
- Freshness: Freshly roasted beans release gas, which slows water flow. As beans age, you often need to grind finer to hit the same taste.
- Roast level: Darker roasts dissolve faster and usually need a coarser grind. Lighter roasts are denser and often need finer.
- Conditions: Humidity and static change how grounds behave, especially in fine settings.
This is why we roast to order at Everything I Need. Coffee that arrives fresh gives you a stable starting point, so your adjustments respond to real changes instead of stale variability. Simple ordering and fast delivery keep your supply steady, which keeps your dial-in consistent.
Keep Your Grinder Consistent
Consistency is the whole game. A great grinder with worn burrs will fight you every morning.
Do these things:
- Brush out old grounds regularly.
- Replace burrs per the maker's guidance.
- Keep beans sealed and away from heat.
- Re-calibrate after cleaning.
- Log your settings and results in a notebook or app.
The best grind setting is the one that produces a cup you love, repeatably. Track your changes, trust your taste, and adjust one step at a time.
Getting grind size right takes practice, and it starts with beans worth the effort. If your coffee tastes inconsistent no matter how carefully you dial it in, the beans may be the variable you cannot control. Everything I Need sources from high-elevation estates and roasts in small batches using precision thermal mapping to remove bitterness and protect complex sweetness. Ordering stays simple, delivery stays fast, and every bag arrives fresh. Get started with Everything I Need and give your grinder coffee that rewards every adjustment.
Frequently Asked Questions
How do I know if my coffee grind is too fine or too coarse?
Taste and flow tell you. If the shot or pour runs fast and tastes thin, sour, or salty, the grind is too coarse. If it stalls, channels, or tastes bitter, dry, or harsh, the grind is too fine. For espresso, aim for a shot that starts as a thin stream and finishes as a slow drip. For pour-over, watch the drawdown: a bed that drains well before the brew finishes usually means the grind is too coarse.
How many grinder steps should I adjust at a time?
One step per test for espresso, then taste. On most stepless or stepped espresso grinders, a single step shifts shot time by several seconds, which is enough to change flavor. For drip, pour-over, and French press, two to three clicks is a reasonable starting move. Change only one variable at a time and keep the dose, water temperature, and brew ratio fixed so you can attribute the result to grind size.
Should I change grind size when I use a different coffee?
Yes. Density, roast level, and freshness all shift how a bean extracts. A darker roast is more porous and usually needs a slightly coarser grind; a dense light roast often needs finer. Beans also release carbon dioxide for several days after roasting, so a fresh bag may need a coarser setting that you tighten as the coffee settles. Treat every new bag as a fresh dial-in.
Does grind size matter as much with a blade grinder?
It matters more, because a blade grinder produces an uneven mix of fine powder and coarse chunks. That inconsistency causes both under-extraction and over-extraction in the same brew, which is why the cup tastes muddy. A burr grinder gives you a repeatable setting and a narrower particle distribution, so each adjustment actually changes the result in a predictable direction.